-
- Bending and Forming
Metal
-
- Forming Wire
-
- Straightening Wire
- To straighten a longer (18"
or more) piece of wire, clamp one end securely in a vice. Grasp
the other end firmly with a pair of pliers. Allow the wire to
go quite slack and then snap it taught. The snapping will stretch
out the kinks and bends. Depending on the amount of straightening
that the wire requires, you may have to repeat the process. For
8 gauge wire and thicker (6, 4, 2, etc..), the vise maneuver
will only work with longer lengths (4 feet or more). Wear gloves and eye
protection when 'snapping' wire.
-
- To
remove kinks or bends from shorter pieces of wire work it with
your hands or a pliers. It is also possible to roll short, relatively
straight pieces of wire back and forth between a board and a
table top to straighten them.
-
- Bending Wire
- Wire
can be bent and formed with the hands to some degree. If a sharp
bend is required, the wire can be bent with a pliers. The sharp
bend can be made even sharper by tapping on the bend with a hammer
while it is held in the pliers or in a vise. Sharp bends in thick
wire (6 and 8 gauge) are best accomplished with the wire held
in a vise. Tap on the bend with a hammer or press on it with
a scrap of wood to sharpen the bend.
-
- The
thicker the wire the more force will be needed to bend. In addition
short piece or tight radius bend may be more difficult to bend
without hand tools.
Once bent wire becomes stiffer, less bendable & holds its
shape. Thinner wire bends more easily than thick. By using some
small pieces of wire to practice the feel of the particular metal
will quickly be learned. Experience is the best teacher for craft.
-
- There
are commercially available wire bending jigs that use pins set
in assorted holes around which you bend the wire. A similar arrangement
can be improvised by hammering nails into a board.
-
- Softening
metal:
- Soft aluminum wire and sheet
is the softest that any metal will be per it's thickness. It cannot be softened any further.
-
- Stiff metal can be softened
by heating up with a torch to very hot and allowing it to cool. This is called annealing.
- This is about 800 degrees for
aluminum (be careful not to heat higher as it melts at 1200)
-
- Annealed metal may need to be
buffed up afterward to get it shiny again.
- Copper brass and aluminum may
have to be "pickled" to remove fire scale- this is
- an acid solution.
Metal will harden as it is being worked and may need to be softened
again.
-
- The thicker any wire is the
harder it is to bend in a tight curve.
- For something like delicate
stemware we suggest pre- bending it around a dowel that is slightly
smaller.
This way you can use more force - like rolling it up on a flat
surface or held in a clamp.
Then spiraling it on to the stemware- in an open coil and then
adjusting the coil. (see open coil below)
-
-
- Radius Bends and Wire Coils
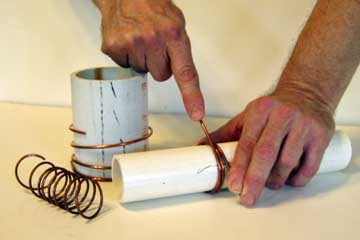 Coils
(and therefore circles) can be made out of wire by wrapping it
around a cylindrical object called a mandrel. Mandrels can usually
be improvised from objects found around the home or studio ranging
from wooden dowels, sturdy straight sided cans, scraps of pipe,
etc. Because the wire has a certain amount of spring to it, choose
a mandrel that is smaller than the inside diameter of the desired
coil. This is best determined with some experimentation. Coils
(and therefore circles) can be made out of wire by wrapping it
around a cylindrical object called a mandrel. Mandrels can usually
be improvised from objects found around the home or studio ranging
from wooden dowels, sturdy straight sided cans, scraps of pipe,
etc. Because the wire has a certain amount of spring to it, choose
a mandrel that is smaller than the inside diameter of the desired
coil. This is best determined with some experimentation.
- Once
the coil is formed, it can easily be cut with a wire cutters
into circles or arcs. To put a radius bend in a length of wire,
bend it only part way around the mandrel.
-
- Forming Sheet Metal
-
- Flattening Sheet Metal
-
- Sheet metal that has been coiled
often has a resulting curve or ripples that can easily be removed.
A rolling pin, large diameter wooden dowel or section of plastic
pipe can be rolled across the face of the metal while it is lying
on a flat surface. First roll one face and then the flip side,
repeating as necessary, to flatten the metal. Large diameter
curves or bends can be removed by reverse bending it against
a curved object of similar diameter. A cardboard core or plastic pipe is good for this.
-
-
- PATTERNS
- A
good first step in forming sheet metal into a three dimensional
shape is to make a pattern out of heavy paper or poster board.
It is easy to make a mistake in length or over look a surface
when transiting from two dimensions to three. The pattern can
be used to 'form' a prototype of the object which can be checked
for accuracy. It is a lot easier and less expensive to modify
or remake the pattern to correct and error than it is to start
over with a new piece of metal.
-
-
-
- BENDING
- The
commercial/ industrial machine used to make sharp bends in sheet
metal is called a Box and Pan Bending Brake. As the name
implies, it is used to make box and pan shapes. Metal clamping
blocks hold one side of the sheet while the hinged 'brake' forces
the other side upward to make the bend. Bending brakes range
in size from small ones for model-making to gigantic machines
for bending things like the sides of air craft carriers.
-
 It is possible to make a simple bending
brake that approximates the effectiveness of the commercial versions.
This home made brake uses two clamps and two boards. Clamp the
metal sheet between the two boards making sure that the boards
are evenly aligned and the metal is being held securely. Roll
the 'sandwich' firmly against a table top to achieve a 90 degree
bend. With some trial and error and by varying the thickness
and dimensions of the boards and the placement of the clamps,
you will be able to make multiple opposing and compound bends. It is possible to make a simple bending
brake that approximates the effectiveness of the commercial versions.
This home made brake uses two clamps and two boards. Clamp the
metal sheet between the two boards making sure that the boards
are evenly aligned and the metal is being held securely. Roll
the 'sandwich' firmly against a table top to achieve a 90 degree
bend. With some trial and error and by varying the thickness
and dimensions of the boards and the placement of the clamps,
you will be able to make multiple opposing and compound bends.
-
-
 Narrow
bends such as a lip or flange along the edge of a piece of sheet
metal can be bent with a pliers. Draw a line where the bend is
intended to be. The secret to this technique is to only partially
bend a pliers' width of the metal at a time as you progress incrementally
down the bend. The process is then repeated until the desired
full bending is achieved. If you try to bend the whole length
at once with the pliers it will not bend sharply or in a straight
line. Narrow
bends such as a lip or flange along the edge of a piece of sheet
metal can be bent with a pliers. Draw a line where the bend is
intended to be. The secret to this technique is to only partially
bend a pliers' width of the metal at a time as you progress incrementally
down the bend. The process is then repeated until the desired
full bending is achieved. If you try to bend the whole length
at once with the pliers it will not bend sharply or in a straight
line.
-
-
- Making Cylinders
- The
machine that is commercially available for forming sheet metal
into cylinders is called a 'Slip Roller'. Slip rollers
range in size from small versions for making 2 foot long sections
of heat duct to huge machines for making pipes for tunnels. A
slip roller uses three rollers firmly set in place. Two of the
rollers clamp down on the sheet metal. As they turn, they force
the metal tangentially against a third, free-turning roller which
causes the sheet to continuously bend upward thereby forming
the cylinder. One of the first two rollers lifts or pivots so
that the cylinder can be 'slipped' out of the machine.
-
-
- Cylinders
can easily made at home using found cylindrical objects as mandrels.
Scraps of pipe and round containers can all be used. Simply hold
one edge of the sheet metal against the mandrel and roll it firmly
on a table top. Any deviation from the cylinder at the start
or end of the sheet can be corrected by bending it with the fingers
or tapping on it with a hammer while the cylinder is still on
its mandrel.

-
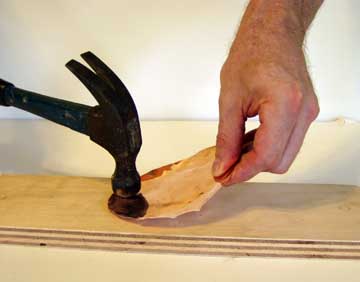
- Doming or Shaping by Hammering
- Another
useful technique for working with copper or brass sheet is to
hammer it into a domed or shallow bowl shape. This is accomplished
by repeatedly denting the metal with overlapping hammer blows
while it is laying on top of a 'sand pillow'. Sand pillows have
been traditionally 6"-12" round in shape, made out
of two circles of soft leather stitched together and firmly packed
with sand. Dense canvas or denim works well if the sand is coarse
and relatively dust free (like play sand). A discarded blue jeans
leg works if the open ends are firmly twisted and tied with string
so the sand does not escape. Remember, the sand must be packed
firmly for best results.
-
- The
best hammer to use for general doming is the standard household
hammer with a smooth, slightly domed, rounded edge face. Hammers
with pointed or ball shaped heads can be used to make a dimpled
texture.
-
-
 Begin
the doming process by cutting the desired shape slightly larger
than the finished size. Hammering will tend to reduce the outside
dimensions. Hold the piece with one hand or a pair of pliers
against the pillow and hammer away. Begin with light overlapping
blows in the area that is to be domed. You will quickly gain
a 'feel' for the process and the material. For a flat topped
(or bottomed) dome shape, only hammer around the outside of the
piece. For an all over doming, spiral your blows from the out
side inward. Begin
the doming process by cutting the desired shape slightly larger
than the finished size. Hammering will tend to reduce the outside
dimensions. Hold the piece with one hand or a pair of pliers
against the pillow and hammer away. Begin with light overlapping
blows in the area that is to be domed. You will quickly gain
a 'feel' for the process and the material. For a flat topped
(or bottomed) dome shape, only hammer around the outside of the
piece. For an all over doming, spiral your blows from the out
side inward.
-
- Deep
doming or hammering any vessel deeper than a tray or plate in
thin (23+ gauge) sheet metal is difficult. Repeated hammering
stretches the metal, makes it thin and hardens it. It is possible
to 'anneal' the piece thereby making it soft again by heating
it to red hot and then quenching it in water. The heating will
greatly discolor the metal and give it a layer of fire scale.
The piece must be cleaned before continued hammering. Traditional
smithing of deep vessels in copper, brass, silver and gold begins
with thick (~1/8" or more) metal sheet that is hammered
and annealed repeatedly.
-
 The
hammering process will cause the edge of the piece to wrinkle
or 'flute' which can be removed by hammering the very outer edge
while it is held against a hard surface. It can be made to lie
flat with dome side up by shaping it with your fingers or tapping
it gently with the hammer held at a slight angle along the outer
edge. The
hammering process will cause the edge of the piece to wrinkle
or 'flute' which can be removed by hammering the very outer edge
while it is held against a hard surface. It can be made to lie
flat with dome side up by shaping it with your fingers or tapping
it gently with the hammer held at a slight angle along the outer
edge.
-
-
-
-
 Evidence
of the individual dents can be smoothed out by burnishing the
piece with a hardwood ball or cabinet knob. Forcefully rub the
ball back and forth across the concave side of the piece until
the dents are smoothed out. Evidence
of the individual dents can be smoothed out by burnishing the
piece with a hardwood ball or cabinet knob. Forcefully rub the
ball back and forth across the concave side of the piece until
the dents are smoothed out.
-
- Doming,
even if only around the edge of a shape, will greatly increase
the shape's strength.
-
-
-
|